Description
The purpose of this plugin is to make it easier for you to install and configure antennas running on Theengs gateway, which allows to listen to Bluetooth devices (BLE) and use them in Jeedom via the MQTT Discovery.
It offers a turnkey solution to perform this configuration.
You are free to install Theengs gateway on your own. An even simpler alternative is to purchase the gateway offered by the Theengs team, see topic here.
I also invite you to consult this documentation for a more detailed understanding of how the system works.
Important
This plugin doesn’t guarantee that Theengs gateway will work on your machine, as there are far too many parameters that can influence the behavior: it depends on your hardware, your system version, the Bluetooth key you’re using, etc. The plugin only installs the application and lets you check its status from Jeedom.
Bluetooth management on the Jeedom Smart box causes serious problems, and most local antenna installations will be non-functional: the installation works and the service starts up, but Bluetooth freezes after a while. This is not due to the plugin or the Theengs gateway application. The plugin can of course be used on a Smart to install a remote antenna.
Supported versions
Important
Antenna installation on Debian Buster (10) is no longer supported. To install an antenna, it is mandatory to have a machine running Debian Bullseye (11) or Debian Bookworm (12) (or raspbian equivalent for raspberry).
| Component | Version |
|---|---|
| Debian | Bullseye(11) & Bookworm(12) |
| Jeedom | >= 4.4 |
Installation
In order to use the plugin, you must download, install and activate it like any Jeedom plugin. Theengs gateway requires the MQTT Manager (MQTT2) plugin to work, this allows to get status of antennas and to easily configure them.
Plugin configuration
Before starting, make sure you have installed and configured the MQTT Manager (MQTT2) plugin, see plugin documentation.
You will then have to configure the connection information to the MQTT broker that the antennas will use, you can simply use the information that has already been configured by MQTT Manager (MQTT2) by choosing the corresponding option from the dropdown list but you can also configure a different username and password for the antennas but this is completely optional. Attention, in the latter case, the username and password configured here must have been created by you, Theengs gateway is not in charge of it.
If you don’t know or are in doubt, use configuration from MQTT Manager (MQTT2).
Important
The information configured here will only be used for antenna configuration. The plugin Theengs gateway will always use MQTT Manager (MQTT2) to connect to the broker.
Devices
The plugin can be found in the Plugins → Programming menu.
Each device will correspond to a Theengs antenna. So you have to start by adding device and giving a name. In the device configuration, you will see the usual settings that are common to all Jeedom device.
Installing the antenna
Then the first thing to do is to choose if it is a local or remote (via SSH) antenna and in the case of a remote antenna you must provide the connection information:
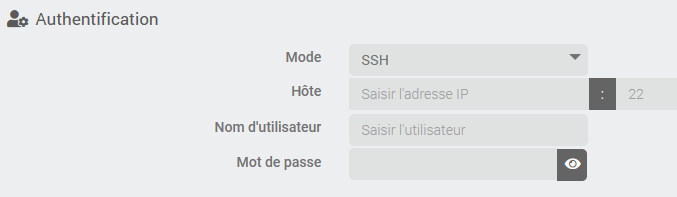
Important
The configured user must be in the sudoers group and must have the permission to
sudowithout password confirmation
If you need help creating and configuring this user, follow these steps
By default the Bluetooth interface used will be hci0, if necessary you can change this configuration.
On the right side of the screen you will see the status of the installation as well as the status of the service:
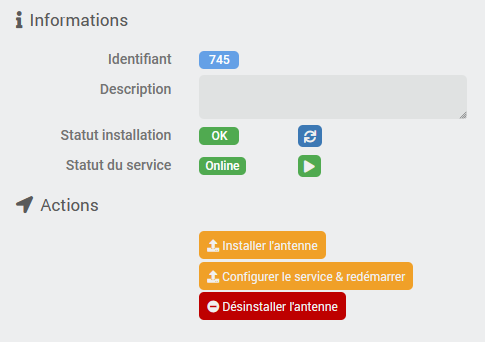
Once you have configured the Authentication section, you need to save the device and then you can proceed to the installation of the antenna by clicking on the Install Antenna button.
Important
This step can be very long (1 hour or more on a ft0). It is very important to be patient and not launch the installation multiple times on the same antenna. On the other hand, you can perfectly launch the installation of several antennas in parallel.
Remember to stop the antenna of the BLEA plugin if you were using the pi for BLEA. As this consumes a lot of resources, it will slow down the installation accordingly.
Both processes (BLEA Antenna & Theengs Gateway) cannot use the Bluetooth at the same time, it is highly recommended to have 2 different Bluetooth keys/chips or only use one of them at a time.
The installation status will change to Ongoing and finally to OK. The installation log will be visible even during the installation in the Analysis → Logs menu and will be named tgw_[eqLogicID]_update so it is always possible to follow the progress of the installation in detail.
Setup and startup
When the installation status changes to OK, you can click on the Configure Service and Restart button, this should only take a few seconds.
This step will write the configuration file and create the TheEngsGateway service on the remote host.
Important
If you change a device parameter or broker connection information in the plugin configuration, it will be necessary to redo the service configuration after having saved the device.
The service will be configured to start automatically each time the system is rebooted or if it fails.
If necessary, a final button allows you to (Re)Start the service, this button has the same function as the Restart command described below.
Optional parameters
In the device configuration you will find several optional parameters that allow you to modify the parameters of Theengs gateway. Most of them are relatively easy to understand and therefore do not require any particular explanation but if necessary do not hesitate to consult the Theengs gateway documentation or community.
Configuring the decoding of random MAC addresses
This configuration makes it possible to decode a random MAC address to the real MAC address and therefore makes it possible to detect the presence of the device.
To do this, you must enter the real MAC address and, separated by a space, the “Identity Resolving Key” (IRK) as you can see in this example:

It is possible to do several configurations, one per line.
To find out how to get this IRK for Apple devices, please see this documentation.
Commands
Each antenna has 3 commands:
- Online info/binary command indicating whether the antenna is online or not. “Online” means connected to the broker and listening to the Bluetooth device.
- Restart action to (re)start the antenna if necessary
- Stop action to stop the antenna if necessary
Annex: how to create a user under Debian and give it sudo permission
The following steps describe how to create a user under Debian (who can be dedicated to the plugin), how to give him sudo permission and allow him to run sudo without having to confirm his password. You don’t necessarily have to follow these steps if you know how to do it or if you already have a user set up properly.
The following commands assume that you are going to perform operations with a user who has the sudo rights itself. If you do them with the user root you should of course not type the sudo command at the beginning of the line.
Important
Do not perform these steps on the machine hosting Jeedom but only on a remote antenna!
User creation
Log in to your machine using the command line (ssh or console) and type the following command to create a user named tgw-user
sudo adduser tgw-user
You will then have to choose his password, follow the instructions on the screen.
Adding the user to the sudo group
Then add the user to the sudo group
sudo usermod -aG sudo tgw-user
Execute sudo without confirming the password
Edit the configuration file with the following command
sudo visudo
At the end of the file, add this line:
tgw-user ALL=(ALL) NOPASSWD:ALL
Exit by typing the Ctrl+x keys and confirm the save by typing O or Y depending on the language of your system (see message at the bottom of the screen)
Changelog
Support
If you have a problem, start by reading the latest plugin-related topics on community.
If despite this you do not find an answer to your question, do not hesitate to create a new topic, with the tag of the plugin (plugin-tgw).
At a minimum, you will need to provide:
- a screenshot of the Jeedom health page
- a screenshot of the plugin’s configuration page
- all available plugin logs, at INFO level, pasted into a
Preformatted Text(button</>on community), no files! - depending on the case, a screenshot of the error encountered, a screenshot of the configuration causing the problem…