Description
A plugin that allows you to control Arlo devices such as cameras, the base station, and the built-in siren. You can control the mode, turn the cameras on and off, view live camera feeds, trigger video captures and recordings, and activate the siren…
All current models supported by the Arlo app (web or mobile) are supported by the plugin: Arlo, Arlo Pro (all versions), Ultra (all versions), Arlo Floodlight, Arlo Essential, Arlo Q, Arlo Go, Arlo Baby, Arlo Security Bridge & Light, Arlo Doorbell, and Video Doorbell…
Here is an overview of the plugin’s features:
- Select mode: On, Off, or Schedule, as well as all custom modes;
- Enable/disable each camera independently of the others (regardless of the current mode);
- trigger the siren built into the base station (or the Pro3 and Ultra) and check its status;
- Check the status of each camera:
- whether connected or not
- General status (inactive, alert, etc.)
- battery level (and whether charging is in progress)
- signal strength
- if sound or motion detection is active
- if sound or motion is detected
- Take a snapshot (stored locally)
- record (stored locally)
- view screenshots and videos
- Start/stop a recording stored in the Arlo cloud
- View live streams from your cameras
- Control the built-in light on compatible cameras
- Control the built-in siren on compatible cameras and bases
Important
We do not recommend using cameras and doorbells from the Essentials or Wire-free lines (i.e., all cameras connected directly via Wi-Fi) if there is no base station in the system, unless they are continuously powered (by the mains or via a solar panel if there is sufficient sunlight), as their batteries do not provide sufficient runtime. If a base station is present, there is no problem.
Supported Versions
| Component | Version |
|---|---|
| Debian | Bullseye(11) & Bookworm(12) |
| Jeedom | >= 4.4 |
Important
Compatibility with 32-bit systems (Raspbian 32-bit on Pi 3) will be removed in a future release.
Installation
To use the plugin, you must download, install, and activate it just like any other Jeedom plugin. Next, you need to install the dependencies.
Setup
Arlo does not allow a single user to be logged in to multiple interfaces at the same time: if you are logged in to the app on one mobile device, you cannot be logged in on another mobile device or on the web interface at the same time. For example, if you log in to the web interface, you will be automatically logged out of the mobile app. The plugin connects to the Arlo system as a standard user and will therefore be subject to the same restrictions.
You must therefore create a user specifically for the plugin; otherwise, it will not work properly.
Two-step authentication
Arlo is gradually rolling out two-step authentication.
Before creating a new Arlo user, it’s important to know the following information:
- The plugin manages this via email using IMAP only, so you’ll need an email account with IMAP access (this is sometimes blocked or requires a fee, so check beforehand), and it only supports authentication via username/password; no MFA for email!
- The plugin must have direct access to the Arlo user’s email account, since Arlo requests the TFA code every time the user logs in! So if the daemon needs to restart, it must be able to retrieve the code on its own.
- The plugin will only read emails sent from “do_not_reply@arlo.com”; so even though it’s recommended to have a dedicated email account rather than an alias of an existing one, this shouldn’t be a problem; it will mark the emails as “read” in the inbox once this is done (and won’t try to read them again the next time it starts up)
- The plugin will search only among the unread emails from the current day, in reverse chronological order (from newest to oldest), and will skip all emails sent before your last login.
- The language of the email doesn’t matter: the TFA code search will work regardless of the email’s language.
Tip
From now on, to log in to a Gmail (Google) or Microsoft email account, you must create an app password, which will not require MFA to log in, since the “unsecured apps” option is no longer allowed. More details on the procedure for Google can be found here: https://community.jeedom.com/t/google-applications-moins-securisees-mot-de-passe-dapplication/85617. For Microsoft accounts (Outlook, Hotmail, etc.), read this https://support.microsoft.com/en-us/account-billing/how-to-get-and-use-app-passwords-5896ed9b-4263-e681-128a-a6f2979a7944
After creating an email account for the plugin, you can move on to the next step.
Creating an Arlo user dedicated to the plugin
- To do this, go to https://my.arlo.com or open the mobile app;
-
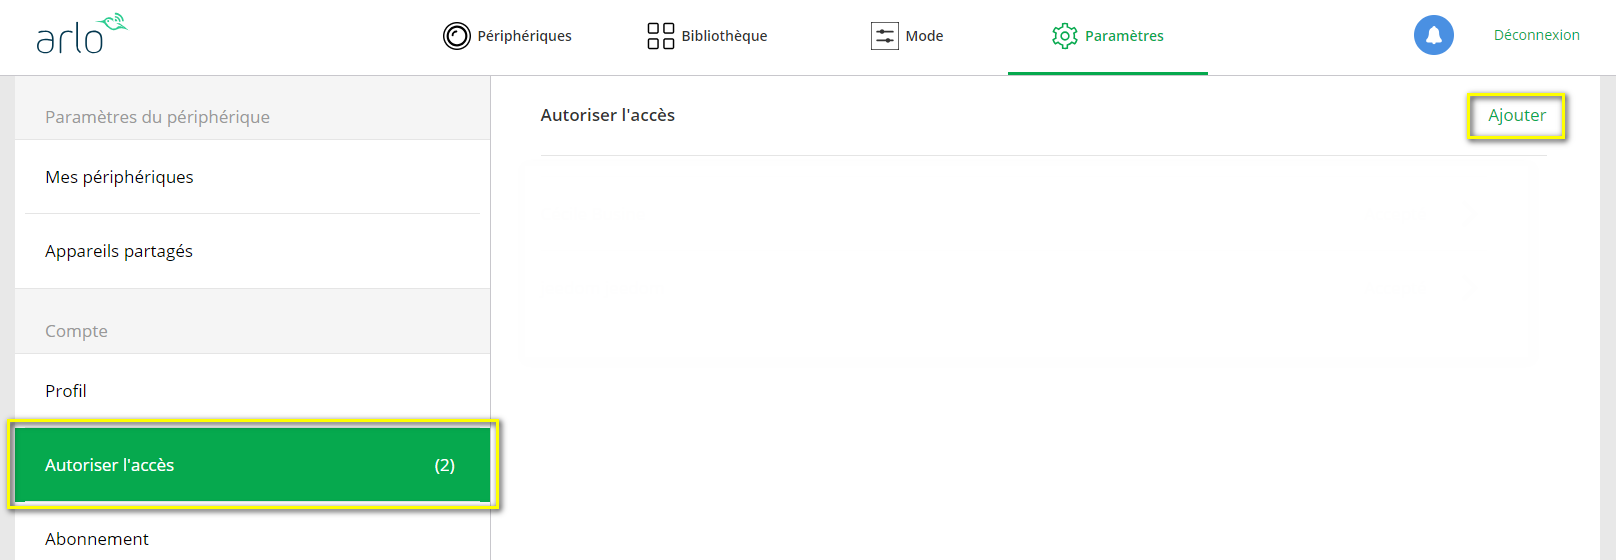
Click “Settings” in the upper-right corner;

-
Click “Allow Access” in the left-hand menu, then click “Add” on the right.
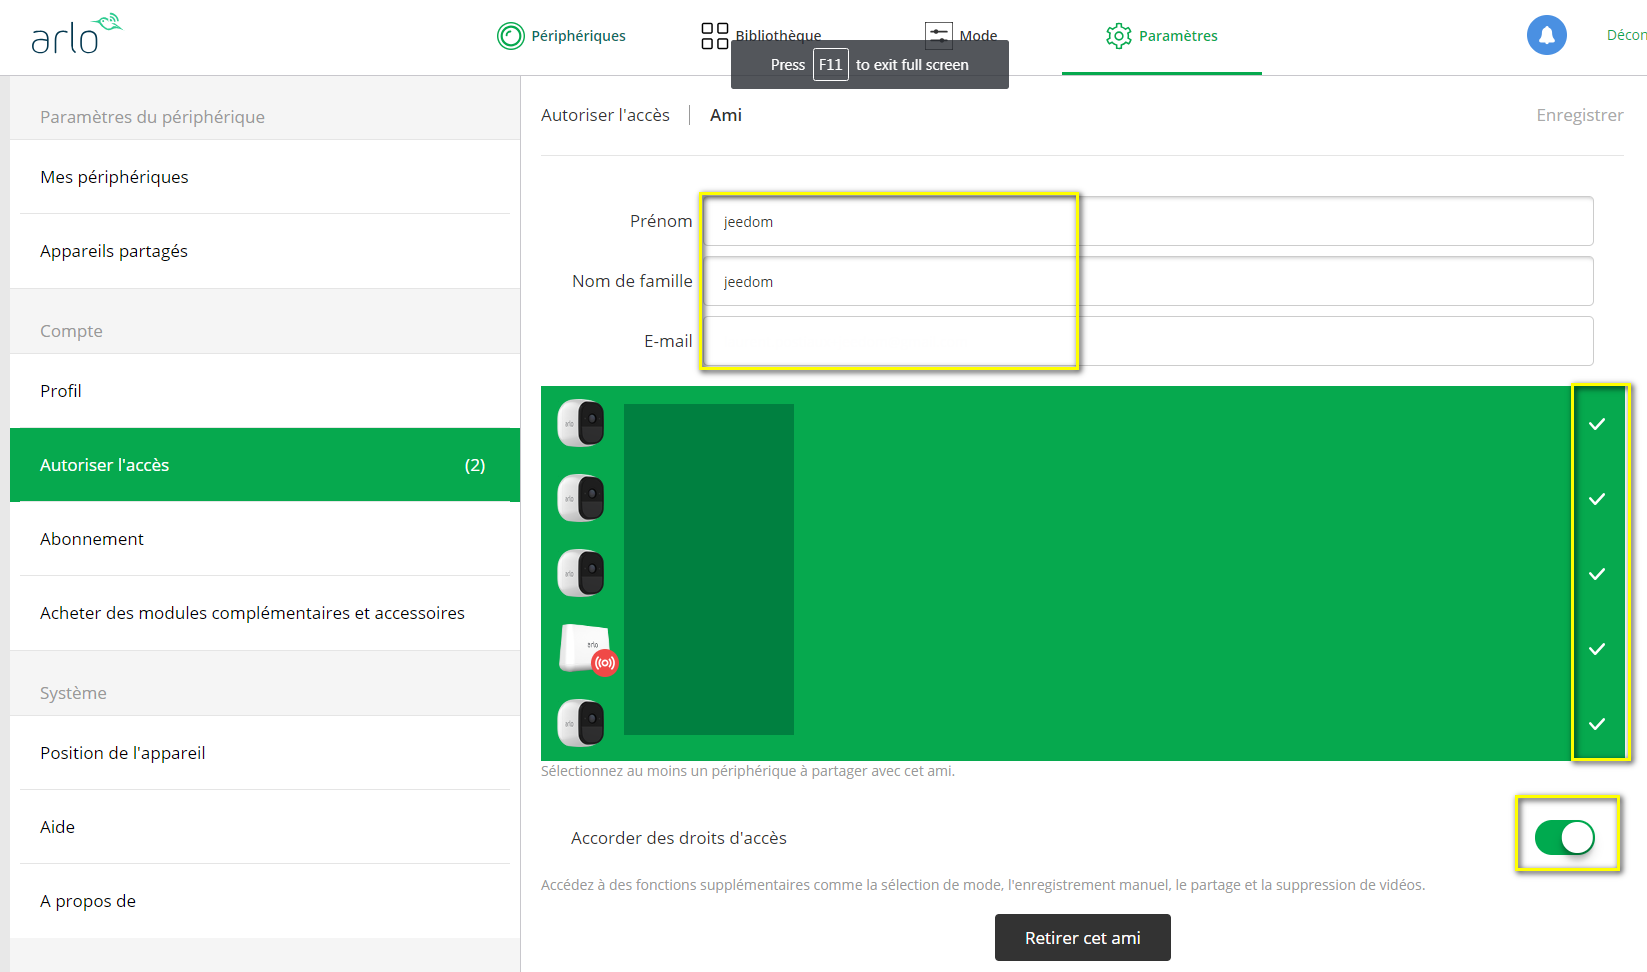
- Enter the requested information, including a new email address (a Gmail alias—such as adding “+jeedom” before “@gmail.com”—will work; however, for two-step authentication, I recommend using an email address dedicated to the plugin);
- Select the Arlo devices that the plugin will have access to;
- Enable the “Grant Access Rights” option to be able to switch modes, start a recording, take screenshots, etc., from Jeedom.
- Click “Send an invitation”
- You will receive a confirmation email to set up your new Arlo account; simply follow the instructions.
Tip
Sign out of “My Arlo,” open an “incognito window” in your browser, or use a different browser to create your second Arlo account.
Plugin configuration
On the plugin’s configuration page:
- Enter your username (the new email address) and the associated Arlo password.
- If you have enabled two-step verification, enter the IMAP address of the mail server in the format imap.server.com, along with the username and password for the associated email account (or the app password for a Gmail account instead of your personal password) (not required if two-step verification is not active on your Arlo account)
- Start the daemon (if it doesn’t start on its own)
If the login information is correct, the status should turn green and the plugin will begin syncing your previously shared devices.
On this page, you can also configure retention rules for screenshots and recordings; these rules allow the plugin to automatically delete the oldest media files (stored locally).
Usage
If the plugin is configured correctly (see the previous step), you should see a list of the Arlo devices you shared when you created the account for the plugin.
It is not possible to manually create a device. Devices are created or updated automatically by the plugin during synchronization with the Arlo system. Synchronization occurs automatically at least once a day; if necessary, you can initiate a synchronization manually via the device management screen.
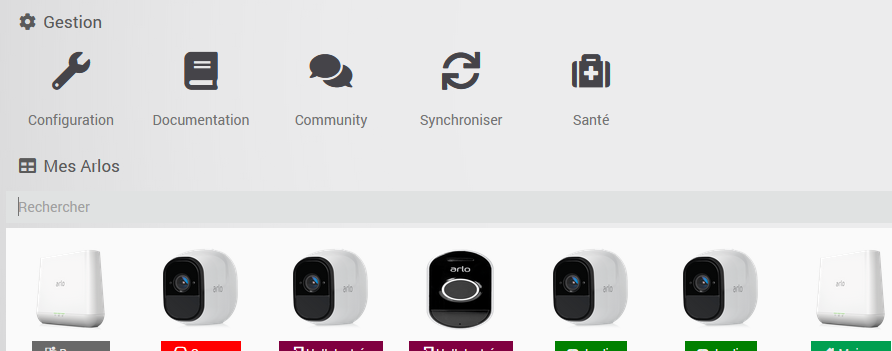
The plugin will never automatically remove a device; if you no longer have the device or if you have revoked the plugin’s access rights, we recommend that you manually remove the corresponding device in Jeedom. If you add a new device or change modes via the Arlo app, we recommend performing a manual sync to update the plugin’s configuration immediately; otherwise, this will happen during the next automatic sync.
Tip
Of course, this does not apply to command values such as the selected mode or motion or sound detection, which are updated in real time.
For most devices, no specific configuration is required; the device name will be the one defined in the Arlo system. However, be sure to assign a parent, select a category, and enable the device.
For camera-type devices, you can configure an action/message command (many compatible plugins). If this is configured, the plugin will send a message—including the image—as soon as a new image is received.
Equipment
Important
It is not recommended to use battery-powered devices (unless they are recharged regularly, for example via a solar panel if there is sufficient sunlight) that are connected directly to Wi-Fi if there is no base station in the system, because their batteries do not provide enough runtime to report events to Jeedom. If a base station is present, however, there is no problem even if some devices are connected directly to Wi-Fi.
Some commands specific to certain models may not be available (yet); in that case, please contact me via the forum for more information.
Tip
If you add a device (hub, camera, doorbell, etc.), you must restart the daemon for it to work properly with Jeedom.
Mode Change
Depending on your setup and your Arlo account configuration, you can choose the mode of operation for your devices—specifically, whether they will detect sound and/or motion, or whether they will be disabled.
It appears that for accounts created through the end of 2023, this is possible on all base/hub-type devices, namely: bases, standalone cameras, or doorbells such as Arlo Go, Arlo Q, Arlo Baby, Essential… Each of these devices has a command button for each defined mode—on, off, and each custom mode—as well as an info command that indicates the active mode.
Some users—specifically those who created their accounts starting in late 2023—will have an additional “location” device of the type you have also configured in your Arlo app. As with the devices listed above, a command based on the current mode will be available. If this applies to you, there is no need to change the modes on the devices; only the mode of this “location” device is taken into account, so that is the one you should use.
Alarm
Devices with a built-in siren (Hub, Essential, Pro, Ultra, etc.) have the following commands for operating it:
- Siren Status: Indicates whether the siren is active
- Siren On: To manually activate the siren
- Siren Off: To turn off the siren
Lamp
Devices with built-in lighting (Essential, Pro, Floodlight, Ultra, etc.) have the following commands to manage the lighting status:
- Light Status: Indicates whether the light is currently on or off
- Turn On Light: To manually turn on the light (for the default duration configured in the Arlo app)
- Turn Off Light: To manually turn off the light
Cameras
The following commands are available on all models:
- Connection: indicates whether the connection to the camera is active
- Activity: Provides a description of the camera’s current activity
- Active: indicates whether the camera is currently active
- On: Makes the camera active; it will be affected by mode changes
- Off: Disables the camera; it will not be affected by mode changes
- Battery: battery level in %
- Signal: Signal strength (between 0 and 4) for the base station on Arlo Pro, Pro 2, and Ultra, and cellular signal strength for ArloGo
- Loading: indicates whether the camera is loading
- Motion Detection: Indicates whether motion detection is active
- Sound Detection: Indicates whether sound detection is active
- Motion Detected: If motion is detected
- Sound Detected: if sound is detected
- Last image: (local) path to the last image captured by the camera
- URL of the latest snapshot: (local) URL for the latest image captured by the camera
- Take a screenshot: allows you to take a screenshot (saved locally) using the camera
- Send a screenshot: Allows you to send a screenshot (which will be saved locally) from a scenario by selecting the notification command to use
- Send a Recording: Allows you to send a video recording (which will be saved locally) from a scenario by selecting the notification command to use
- Start Recording: Starts video recording (saved locally)
- Stop Recording: stops a local recording
- Start Cloud Recording: Starts recording to the Arlo cloud
- Stop cloud recording: allows you to stop recording to the Arlo cloud
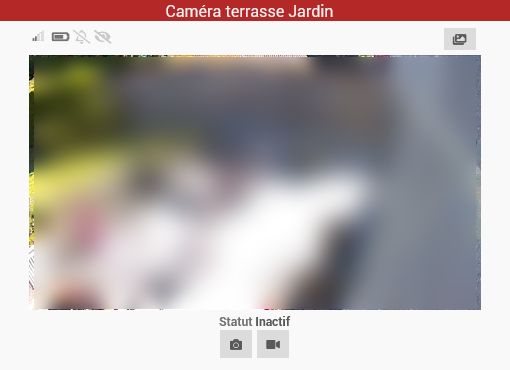
The widget has a few unique features. From top to bottom and left to right, you’ll see:
- Signal strength with the base station
- battery level
- Sound indicator, 3 possible states: detection disabled, monitoring active, sound detected.
- The motion sensor has three possible states: detection disabled, monitoring active, motion detected.
- A button to open the library where you can view screenshots and recordings saved locally.
Next, the most recent image captured by the camera is displayed; by clicking on it, you can view the camera feed in near real time (with a delay of a few seconds).
And below that, a button to take a snapshot and start recording (locally).
Arlo Baby
Arlo Baby is now fully integrated; you can fully control the camera and all its features from the plugin: the nightlight, the lullaby, and access data from the air quality sensors.
Here is an overview of the available commands:
- IP: the camera’s IP address
- Brightness: room brightness
- Temperature: room temperature
- Humidity: in percent
- Air Quality: as a percentage; less than 30% is “normal,” 30% to 65% is “abnormal,” and more than 65% is “very abnormal” (according to Arlo’s documentation)
- Nightlight: Indicates whether the nightlight is currently on or off.
- Nightlight On and Nightlight Off: to turn the nightlight on and off
- Nightlight Mode: The available modes are: White, Color, Light Show
- Nightlight Brightness: Info and action commands for adjusting the nightlight’s brightness
- Nightlight Color: Info and action commands, and to change the nightlight color (in Color mode)
- Color temperature: info and action commands to change the color temperature (in White mode), values between 2500K and 9000K
- Nightlight Timer: information and action commands to set the timer and check the remaining time (in minutes) before the nightlight automatically turns off
- Playback: a binary command and a string command that return the playback status of the lullaby
- Play, Pause, Next: command for managing playback status
- Track: displays the selected track, and Playlist displays the list of available tracks
- Repeat: Info and action commands to enable and disable repeat mode: continuous playback or single-track playback
- Random: info and action commands to enable and disable random mode
- Volume: lets you check and adjust the volume of the lullaby (in %)
- Lullaby Timer: Info and action commands to set the timer and check the remaining time (in minutes) before the lullaby automatically turns off
Arlo Go
The following commands are also available on the Arlo GO:
- Network Name: Specifies the name of the mobile network
- IP: the current IP address
- Active network: shows the currently active network (Wi-Fi or mobile)
Arlo Security Bridge & Light
The “light” device includes the following commands:
- Light Status: Indicates whether the light is currently on or off
- Turn On Light: To manually turn on the light (for the default duration configured in the Arlo app)
- Turn Off Light: To manually turn off the light
- Motion Detection: Indicates whether motion detection is active
- Motion Detected: If motion is detected
- Connection: indicates whether the connection is active
- Battery: battery level in %
- Charging: indicates whether the device is currently charging
Arlo Doorbell and Video Doorbell
The doorbell has the following commands:
- Connection: indicates whether the connection is active
- Battery: battery level in %
- Signal: signal strength (between 0 and 4) with the base station
- Motion Detected: If motion is detected
- Button: if the doorbell button has been pressed (it will remain active for 1 minute after the last press)
- Silent Mode: Indicates whether silent mode is enabled
- Silent Mode On: Enables silent mode
- Silent Mode Off: Turns off silent mode
Arlo Video Doorbell
In addition to the commands listed above, the Video Doorbell has a few commands that are common to cameras:
- Activity: Provides a description of the camera’s current activity
- Loading: indicates whether the camera is loading
- Motion Detected: If motion is detected
- Last image: URL (local) to the last image captured by the camera
- Take a screenshot: allows you to take a screenshot (saved locally) using the camera
- Start Recording: Starts video recording (saved locally)
- Stop Recording: stops a local recording
- Start Cloud Recording: Starts recording to the Arlo cloud
- Stop cloud recording: allows you to stop recording to the Arlo cloud
Viewing video feeds from cameras - live streaming
By clicking on the thumbnail on the widget, you can start the camera feed. The video will open in a new window, and you can, of course, switch to full screen:
This is a live video stream; the camera and the stream will stop when the window is closed.
The Library
When a local video recording is made, or when a screenshot is taken by the plugin or received from Arlo upon motion detection, these can be viewed through each camera’s library tool.
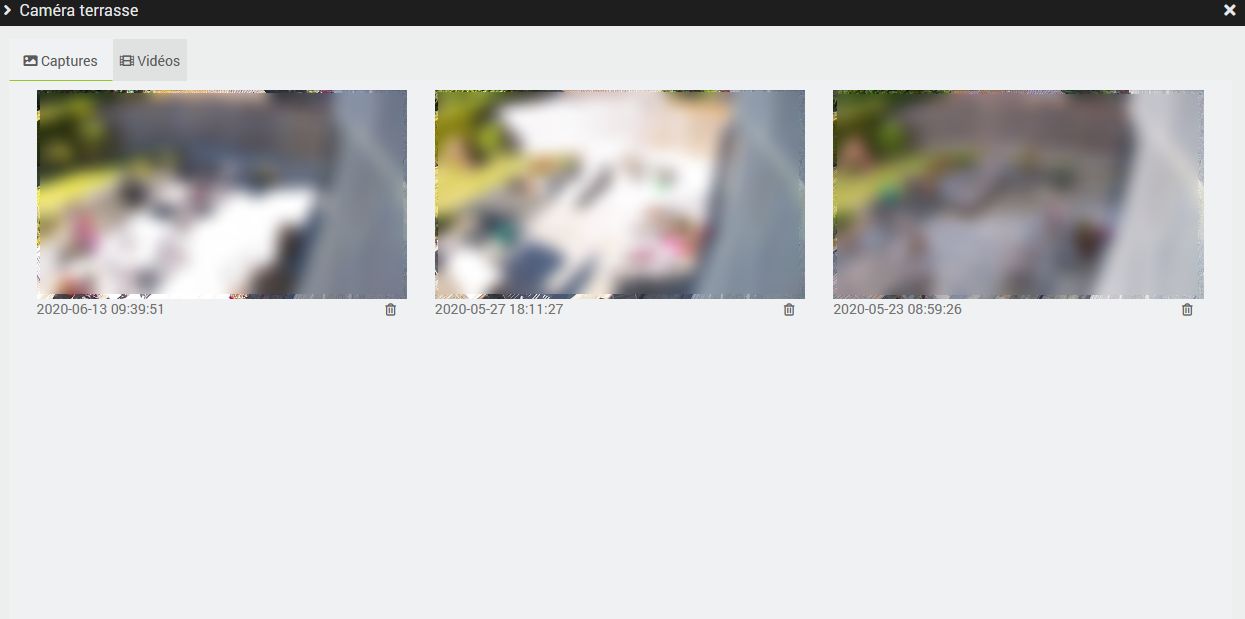
On this screen, which displays an overview of the screenshots and videos captured, you can delete files directly and permanently if you wish; otherwise, the plugin will handle this automatically according to the rules defined in the settings. You can also click on the screenshots to view them in a larger window or on the videos to start playback.
Integration with Jeedom Connect
You can use the camera widget from Jeedom Connect to integrate Arlo cameras with this mobile app.
For this, I recommend the following configuration:
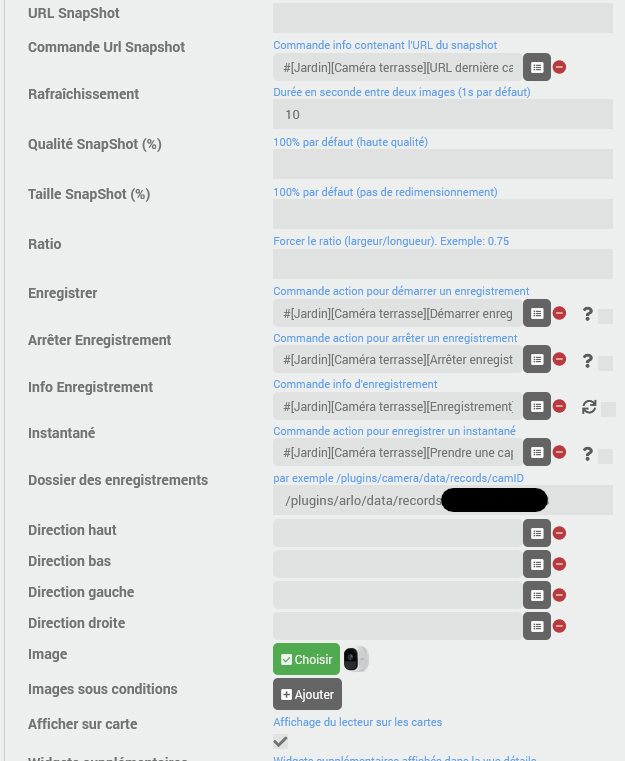
- the camera’s “Last Snapshot URL” command (the one that returns text information starting with “http” pointing to your Jeedom, not the one that displays the Arlo image) for the Snapshot URL Command setting in the widget
- the Start Recording, Stop Recording, and Recording commands for the Record, Stop Recording, and Recording Info settings of the widget
- In the Recording Folder settings, you must copy the path displayed on the Arlo camera’s configuration page, as shown in this screenshot:
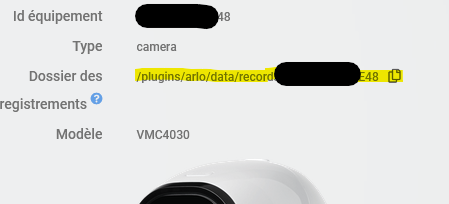
You can use the small “Copy” button to the right of the path to copy it to the clipboard, and then simply paste the information into the widget settings on Jeedom Connect
Currently, it is not possible to view the live video stream from the Jeedom Connect app.
Change log
Support
If you’re having a problem, start by reading the latest threads related to the plugin on community.
If you still can’t find an answer to your question, feel free to create a new thread—and don’t forget to include the plugin tag (plugin-arlo).
At a minimum, you must provide:
- a screenshot of the Jeedom Health page
- a screenshot of the plugin’s settings page
- All available plugin logs at the INFO level, pasted into a
Preformatted Text(use the</>button on the community), no files! - Depending on the situation, a screenshot of the error encountered, a screenshot of the problematic configuration…